Organic Whole Foods Made with Integrity
Wholesome Chef Mici
  • Home
  • About Mici
  • Services
  • Recipe Blog
  • Photos
    • Paleo Pix
    • Macro/Desserts Pix
  • Videos
  • Gluten?
  • Paleo?
  • Like Minded
  • Testimonials
  • Contact

Cream of Symphony Soup

11/25/2013

0 Comments

 
Picture
I have been genuinely surprised that everyone has verbally, without provocation, told me how much they love this soup. Creamy and full of flavor. Add bacon or leave just veggies. It has so many vegetables in one serving, its a great way to get the less-used veggies into your diet.

Perfect light meal-in-a-bowl after all the holiday over eating.


1 Onion
1-2 cloves of Fresh Garlic
1 small Zucchini

1 bunch of Asparagus
1 head of Broccoli
1/2 head of Cauliflower
1 small Celery Root
1-3 tbs. Grass Fed Butter

Chicken stock or Water
5 oz. Container of Arugula
Sea Salt to taste

Picture
Peel the celery root and clean and chop up all your veggies. It doesn't matter the size as this soup will be being blended. Yippee! Easy.

Picture
Use your broccoli stems! Under that tough skin is tender broccoli flesh.

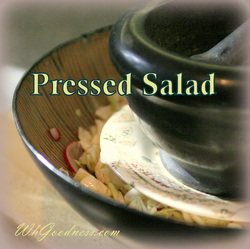
This is an other idea for your broccoli stems (Pressed Salad)

Picture
Make your chicken stock or skip this step if you're using just water. (Click here for instruction)

Picture
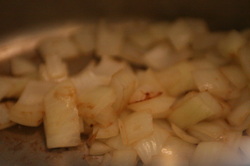
Saute your onions in a generous pad of butter.

Picture
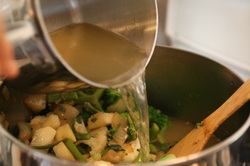
Then add all your veggies, minus the arugula, and the broth to the pot. Bring to a boil and simmer until everything is tender. About 15-20min.

Picture
OPTIONAL: Add 2-4 strips of bacon or turkey bacon for an added umph!

Picture
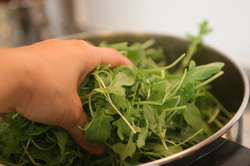
Once everything is soft, add the arugula and simmer 3-5 min.

Picture
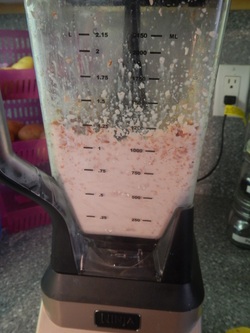
Blend with an immersion blender or in batches in your regular blender. Season with salt to taste.

Picture
Symphony Soup.

Delish.

0 Comments

Favorite Fun Juice

11/20/2013

0 Comments

 
Picture
This is by far my #1 Juice if you ask me what combination feels right. It's a sweet, earthy juice with pick me up power. When I was Director at a local vegan restaurant and stuck at my desk, I'd call down to the juice bar. "My regular, Please." Everyone knew what to make and then it was hand delivered. Boy I miss that!

Please feel free to adjust to your liking. And refrain from drinking over white carpet or clothes... Don't ask.

2 Oranges
1 Beet
4 leaves of Kale
6 Carrots


0 Comments

Pressed Salad

11/16/2013

0 Comments

 
Picture
What the...?! Why would you want to press a salad? Most people like them un-wilted. In Japanese style macrobiotics, the pressed salad is used for live enzymes from raw food, but adding a pickling quality to make it more digestible. This is particularly useful for those with poor digestion that are sick or weak. I'm neither, but still love the crunchy, wilted style of this salad.


Hard veggies of choice (just choose 3):
Examples:
Cabbage (green or Napa)
Red Radishes or Daikon
Red Onion
Broccoli Stems
Cucumbers

If you like, something green (just choose 1):
Examples:
Root Tops for color (carrot, radish, daikon...)
Arugula
Collards

Ume Vinegar or Sea Salt
Large Bowl
Small Plate
Something Heavy


Picture
The trick to a good pressed salad is that you need to slice all your vegetables very thin. This way the pickling process happens quickly.

Picture
Here I've used Cabbage, Red Onion...

Picture
...and Radish.


But this dish is a great way to use those pesky broccoli stems that they make you buy with the tops! They're tender and have a light broccoli taste.

Picture
Take the tops off for use in another dish.

Picture
Peel the hard fibrous skin off with your knife.

Picture
Slice on a thin diagonal.

Picture
And then into a thin matchstick.

Picture
Place all your sliced veggies in a large bowl and knead in ume vinegar or salt. I can't tell you exactly how much as there are too many variables, but make sure that the veggies glisten or actually have water drip off them when you squeeze them. This amount of wetness will vary depending on the vegetable you choose.

Picture
Place a small plate on top of the veggies and then something heavy on top of the plate. This is where pressure and time help the salt to change the energy and start the pickling process.

Picture
After 15 minutes you should see water rise above the vegetables. If you don't then you need more ume or salt.

Then let it press for 30min to an hour depending on your choice of veggies.  Harder veggies can have a longer time.

Picture
Strain the excess water and squeeze the veggies.

Taste them, too. If they are too salty, then rinse them and squeeze the excess water off.

Picture
Ready to eat as is or with your favorite dressing.

I like my dairy-free ranch. It makes it taste like coleslaw.

0 Comments

Marinated Porto Bellos

10/26/2013

0 Comments

 
Picture
Porto Bello.... It just rolls off the tongue. Maybe I cook them just so I can say I'm having Porto Bellos? But really, they are so meaty and add depth to any salad or hot dish you make. Stuff them or simply add them as a side dish. This is my favorite recipe to "marinate" and pan fry them. Then the world is your oyster as to what you do next.


2-3 Porto Bellos
Sea Salt
Balsamic Vinegar
Olive Oil
Pepper to taste
Water or cooking wine

Picture
Wash your Porto Bellos with a dry clean towel. Make sure to cut off the dirty part of the stem.

Picture
Pan fry them in olive oil, lids down, to brown their tops a bit. Once they're brown, add salt, pepper, 2/3 water and 1/3 vinegar to cover them half way . Flip them over and add a lid. Simmer with lid ajar.

Picture
When all the liquid is gone, then you are ready for your next step.

What ever that may be!

Picture
Stuff with seasoned ground meat or other yummy mixture while cooking so both are done at the same time.

Picture
Simply chop and add to a salad.

Picture
Imagination: What will you do?
Casserole?
Sandwich?
Baked with eggs?
Frisbee?
(just checking to see if your imagination is working.)

0 Comments

Cauliflower Pizza

10/17/2013

0 Comments

 
Picture
I made this for my clients, and had to do a taste test, right? Difficult to stop tasting!!!! Who needs flour crust when something like this is sooooo goooooood? I call it Cauli Pizza (like Cali Pizza for California...)

They moved like hot cakes at a friend's play date... Yes, Children LOVE pizza, even if its made entirely of vegetables. Just keep the secret to yourself.

1 very large head of Cauliflower
2-4 tbs. Soft Goat Cheese
2 Eggs
Pinch of Salt
Italian Herbs and Spices if you like
Olive Oil
Parchment Paper
Cheese cloth
Plate
Colander
Something heavy


Sauce you prefer (I'll be posting one of my recipes soon)
Toppings you prefer (I like arugula, caramelized onions and sometimes grilled eggplant!)

Picture
Steam Cauliflower until soft. Discard water.

Picture
Blend in a blender until smooth pate.

Picture
Then pour into a colander lined with cheese cloth and twist to secure the opening. Place a plate on top and a weight on top of that (or push water out with a spatula).

Picture
This is one of my set ups in one of the kitchen I work in.

Let sit for 10-15min to drain liquid out.

Picture
While waiting for the cauliflower to drain, gather your other ingredients and prepare anything you need to for your toppings. Line your casserole with parchment paper. This makes it so much easier to serve.

As you can see, I've caramelized some onions in the background.

Picture
You can do this by sauteing in butter with a pinch of salt until they are brown and sweet. Add a little water if necessary to not burn them.

Picture
Add your eggs, salt, cheese and any spices you may like. Whip or blend with a fork until creamy.

Picture
Add a bit of olive oil to give that Italian flavor.

Picture
Pour into a parchment lined casserole dish and smooth top with a spatula.

Picture
Bake at 350 degrees for 20-30min or until golden and firm to the touch.

Picture
Top with your sauce and veggies or meat. Serve hot or cold... or room temp. It's so tasty you may want to make a double batch!

0 Comments

Caramelized Onion Pate

10/17/2013

0 Comments

 
Picture
Dips are such a great way to enjoy your veggies! This is one of my favorites, and it's so easy to do. You can make it raw or roasted. Dip veggies, or spread on your favorite crackers. Either way, its a crowd pleaser.

The difference between these 2 recipes is time and time! Raw will take a lot more time, but if you prefer your dip to not be cooked, then the description is to the right!

Roasted:
2 cups Raw Cashews, we will roast
2 large Onions
1/4 pinch salt
3 Tbs. Olive Oil
3 Tbs. Balsamic vinegar(I really like to use flavored ones. Fig is my preferred)
3 Tbs. Sweetener like coconut nectar or date syrup
1 Tbs. Sea Salt
1/4 cup water

Picture


1. Place all the ingredients except water into a saute pan and saute on med low flame until the onions are golden and gooey. Add water during the browning just to make sure they don't burn.

Picture


While your sauteing, place your cashews on a sheet pan and Bake at 350 degrees for 10-15min or until golden and aromatic.

Raw:
1 1/4 cup Raw Cashews, Soak for 2-8 hours
2 large Onions
1/4 pinch salt
3 Tbs. Olive Oil
3 Tbs. Balsamic vinegar
3 Tbs. Sweetener like coconut nectar or date syrup
1 Tbs. Sea Salt
1/4 cup water


Picture


1.Thinly slice your onions into half moons and toss in a bowl with the rest of the ingredients. Let sit for 1-2hours to marinate.

Then drain and place in dehydrator at 115 for 5-6 hours. Save the marinade for the blender.


Now, follow the same directions for either roasted or raw.
Picture
Separate your onions in half.

one half will go in the blender and the other will either be garnish or mixed in to the final product.

(Don't be alarmed if you have more onions than in this picture. I made a small batch this day)


Picture
Blend your cashews with all the ingredients (except half of the onions for garnish.

You want a thick pate, not a pourable texture, so add a little water if needed. This is best accomplished with a food processor or the type of blender that I have called the Nija. It has 6 blades as opposed to just on the bottom like traditional blenders, so it acts like a food processor.

Picture
Pour into your serving or storage bowl and either top with the remaining onions or stir them in.

YUMMMMMMMmmmmmmm!

One of my cracker recipes to come soon...

0 Comments

Kale Chips Red Pepper

10/12/2013

1 Comment


Picture
4 bunches Organic Curly Kale
1 Organic Red Bell Pepper
2 cups Organic Cashews, raw 
(or 1 cup sunflower seed butter if nut-free)
1 tsp. Onion Powder
1 tsp. Garlic Powder
2 tsp. Paprika
2/3 cup Lemon or Lime Juice
2 tsp. Lemon or Lime Zest

1/2-1 tsp. Sea Salt
Mmmmmmmmm Chips!

Who cares if they are green... They're yummmmmmy and hit the spot when you need crunch! They are so packed full of nutrition, too!
For some of my clients, they are a weekly must have!

Cut this recipe in 1/2 if you have a small dehydrator.


Picture
Roast your cashews in a 300 degree oven until golden brown and aromatic. If you prefer your kale chips to be raw, then soak your cashews overnight instead.

Picture
Clean and sanitize your sink. Be sure to also get the stopper for the drain. Fill with water and dunk your kale to clean off all dirt and bugs. You can add some vinegar if you like. I de-stem at this point, too. Drain the water and fluff the kale to get as much excess water off as possible.

Blend all your ingredients well. I like to make this a thick pate as the kale will be holding quite a bit of water from washing. Use the Kale to clean out the blender so you get every little bit! Knead the mixture into the kale to cover it all evenly.

Picture
Place evenly on dehydrator trays.

Dehydrate at 135 degrees for 5-8 hours.

Or if you prefer your Kale raw:
Dehydrate at 130 for  45 min and then down to 105 until done. This could take up to a day or two to get crispy.

Picture
You will know they are done when they are crunchy like potato chips and have no more wet leaves. They will darken in color.

Picture
Dig in! This made 4 big bags!

But that doesn't mean they last very long!

One of my favorite snacks of all time...

Kale chips... Come and get 'em!

1 Comment
Forward>>
    Picture

    Author

    Mici is the owner of Wholesome Goodness.

    These recipes are focused on wholesome ingredients from the garden or farm with very little sweet if any. They are gluten or grain free and organic, grass-fed or pasture raised.

    She menu plans, shops, cooks, cleans and fills the fridge with healthy Gluten-Free meals and naturally sweet desserts!

    She also teaches and does personal menu planning for those with restricted diets.

    To sign up for blog email  updates click:

    Email Updates

    Categories

    All
    A Beef
    A Chicken
    Baking
    Breakfast
    Dehydrator Fun
    Holidays
    How To...
    Juices & Smoothies
    Kitchen Tricks
    Light Breakfast
    Macrobiotic Techniques
    Non-Bovine Dairy
    Paleo
    Paleo Quality
    Party Dishes
    Raw
    Sauces & Dressings
    Simply *Sweet*
    ~Snacks~
    Soups & Stews
    Veggies!

    Questions?

Submit
"I have been richly blessed by Mici’s healing presence in my life.  As a facilitator of personal transformation, her passion and dedication to serving others is evident.  I have grown tremendously from her gifted use of emotional healing work, nutritional counseling, culinary artistry and organizational skills.  She unfailingly demonstrates the highest efficiency and effectiveness, true strength of character, wisdom reaching well beyond her years and a generous heart of gold."    

~Gabriella B.


Proudly powered by Weebly